
Connecting an SD Card to the Raspberry Pi Pico
The Raspberry Pi Pico is a very capable device, but it lacks the ability to store sizeable amounts of data on the board. This is a useful function when using the Pico for tasks such as data logging. To make this function practical we can use an SD card for expanding storage via an adapter.
SD cards are great for storing logging and data from microcontroller projects that can then be read on a computer.
We can use SD cards in Serial Peripheral (SPI) mode which allows us to rely on easy to use SPI peripherals and libraries for communication. SPI mode is perfect if we’re writing short amounts of data to a file (e.g. event logging).
I've written this short explanation as part of the much larger book 'Raspberry Pi Pico Tips and Tricks'. You can download it for free from here.
SD card adapter or adaptor.
First the elephant in the room. Whether you spell it adapter or adaptor, it means the same thing. Let’s not get hung up on the semantics of language usage. As a gesture of improving international relations (or perhaps it’s just a personal weakness) I will spell it both ways, although I tend to lean towards adapter.
My personal SD Card adapter journey
I’ll be the first to admit that I haven’t exactly got a large amount of experience in using SD card adapters, but while going the through the process of testing different adapters and cards, I came across a few inconsistencies. This varied between adapters and card types. With that in mind, stay flexible and be patient. Have a range of cards on hand, and don’t be afraid to try something new like rolling your own adapter made out of a standard adapter and some header pins. Also try to start from a consistent baseline with a freshly formatted SD card, ensuring that it’s formatted using the FAT32 file system. And while we’re here, we can’t do anything fancy like having multiple partitions on our SD card. There can be only one! (Gratuitous Highlander reference)
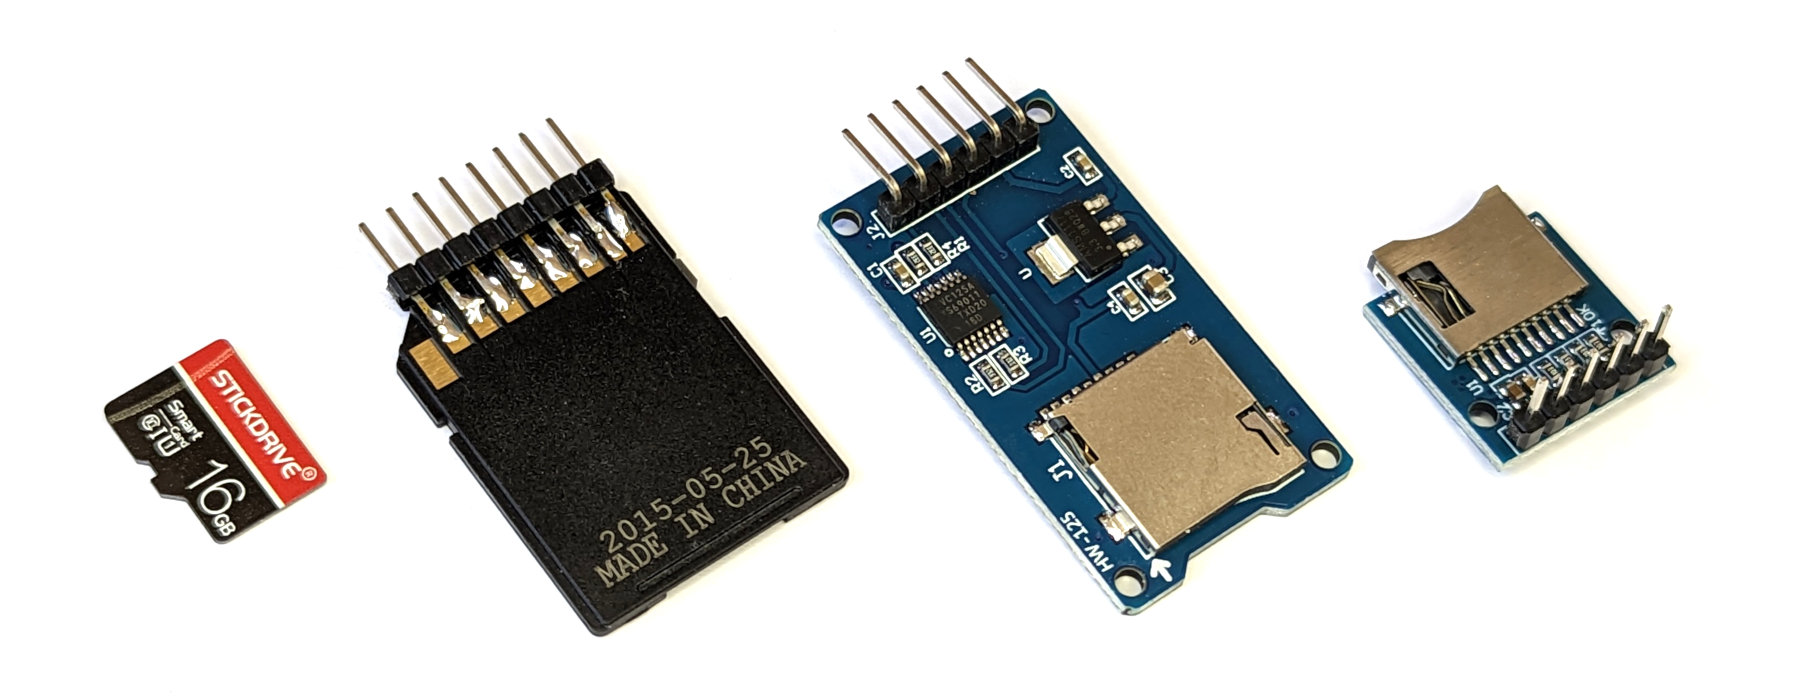
Choose your weapon
While writing this section I used a few different adapters. From the range below I had consistently good results from the smaller adapter and the ghetto version that I created from a traditional adapter and some header pins. I never god results that I was happy with using the larger circuit board version. This might have been some combination of software, hardware and my own personal incompetence, but there it is.
Install the SDCard Library.
The modules for supporting SD card use are not yet (as at 2022-10-31) built into the MicroPython distribution for the Pico, so we can add them simply enough manually (once they are included, if an observant reader notices before I do, could you let me know and I will update this section of the book :-))
To make use of the module we will need to download it from GitHub and then copy it over to our Pico. I found this most easily accomplished by first downloading the file to the main computer and then going File >> Open on Thonny and selecting the appropriate file. From there go File >> Save as… and select the Pico as the location to save the file (making sure to save it with the appropriate name (sdcard.py))
Connect the SD Card Adapter
The Serial Peripheral Interface (SPI) utilises four physical connections. Typically on an adapter they will be labelled as such;
- SCK: Serial Clock
- MOSI: Master Out Slave In
- MISO: Master In Slave Out
- CS: Chip Select
In turn they will be connected to one of the sets of SPI connections on the Raspberry Pi Pico. In our case we will use controller 0 (the pico has two controllers and four sets of possible connections to the GPIO pins) and GPIO pins 16 - 19
- SPI0 RX (GPIO16) <-> MISO: Master In Slave Out
- SPI0 CSN (GPIO17) <-> CS: Chip Select
- SPI0 SCK (GPIO18) <-> SCK: Serial Clock
- SPI0 TX (GPIO19) <-> MOSI: Master Out Slave In
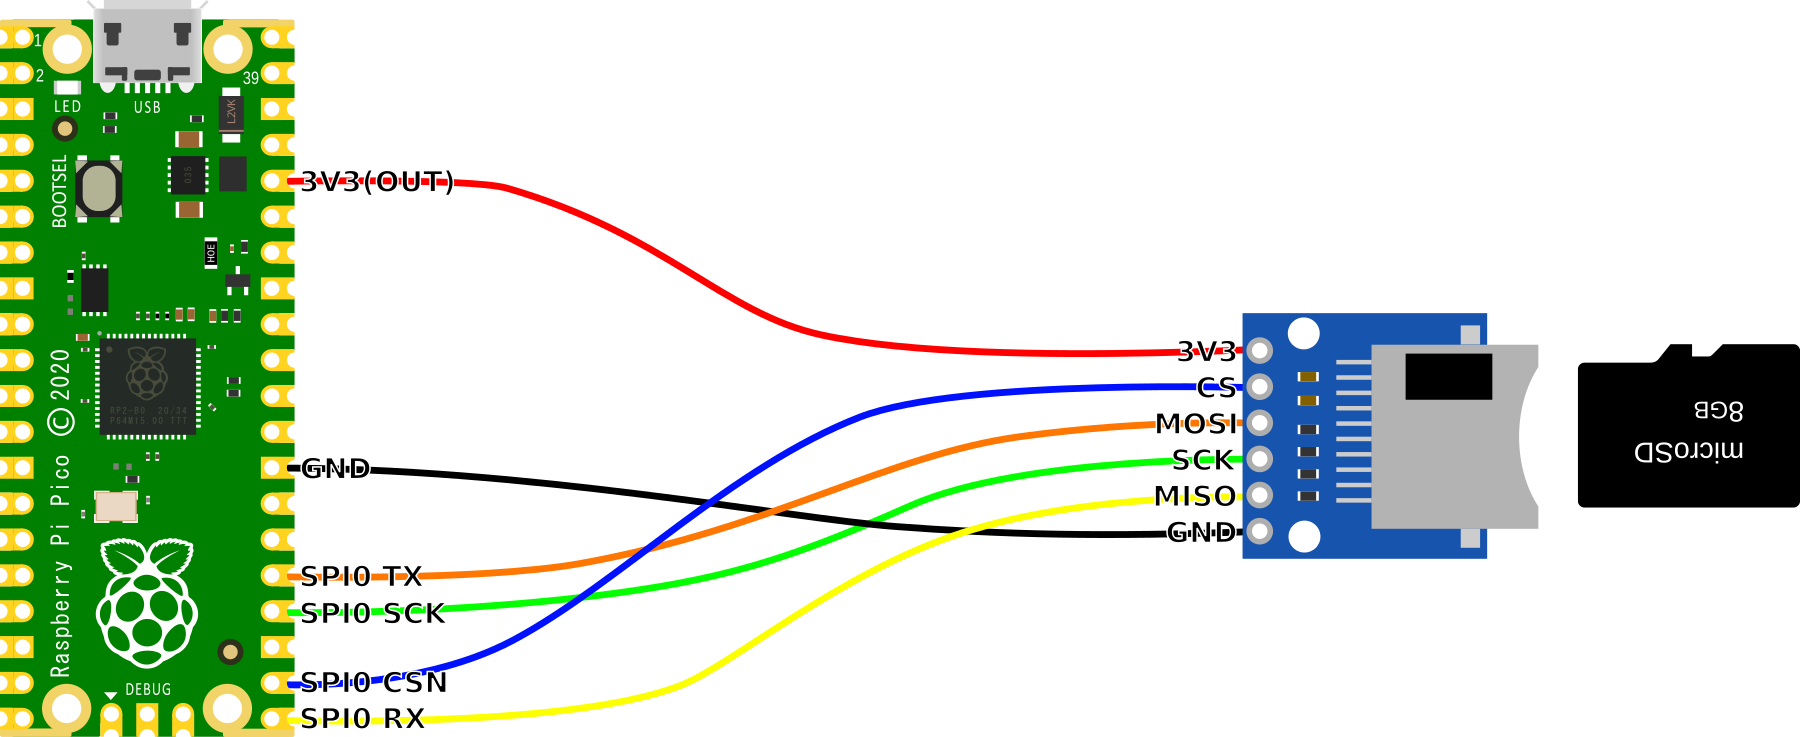
Of course we also connect up or 3.3V and ground connections.
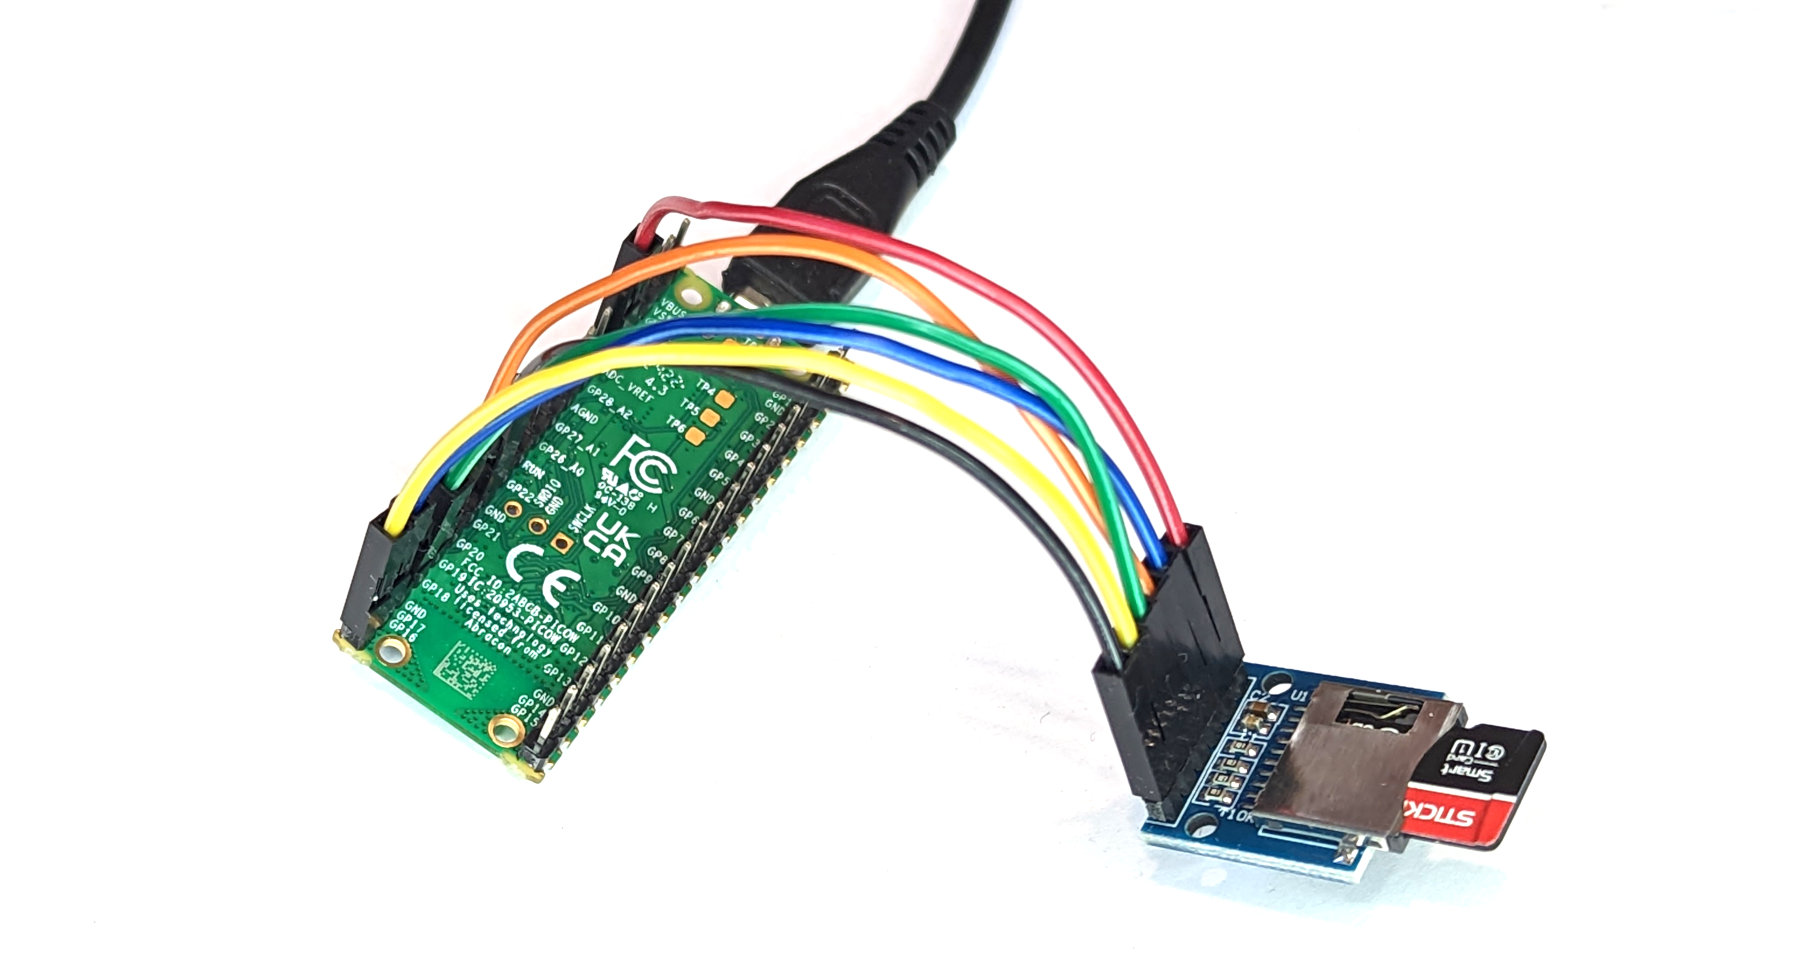
In a practical sense, connecting up with Dupont connectors is a simple method to test functionality.
Code
In a new new document, enter the following code:
import machine
import sdcard
import os

# Set the Chip Select (CS) pin high
cs = machine.Pin(17, machine.Pin.OUT)

# Intialize the SD Card
spi = machine.SPI(0,
                  baudrate=1000000,
                  polarity=0,
                  phase=0,
                  bits=8,
                  firstbit=machine.SPI.MSB,
                  sck=machine.Pin(18),
                  mosi=machine.Pin(19),
                  miso=machine.Pin(16))
sd = sdcard.SDCard(spi, cs)

# Mount filesystem
vfs = os.VfsFat(sd)
os.mount(vfs, "/sd")

# Create a file in write mode and write something
with open("/sd/sdtest.txt", "w") as file:
    file.write("Hello World!\r\n")
    file.write("This is a test\r\n")

# Open the file in read mode and read from it
with open("/sd/sdtest.txt", "r") as file:
    data = file.read()
    print(data)
Make sure you have the SD card inserted into the breakout board and click the Run button. You should see the contents of the file that is created (sdtest.txt) printed out in the shell. We can go one step further and eject the SD card from the adapter and plug it into our desktop machine where we can browse to the file and read it from the computer.
Our code above has the feature of creating the file sdtest.txt when it writes to it. This also means that it will overwrite the file every time it is run. If we want to append information to an already existing file we can use an a instead of a w. Something similar to the below would do the trick placed between the write and read blocks;
If we were utilising the SD card as a store for a data logging application, we would be appending information.
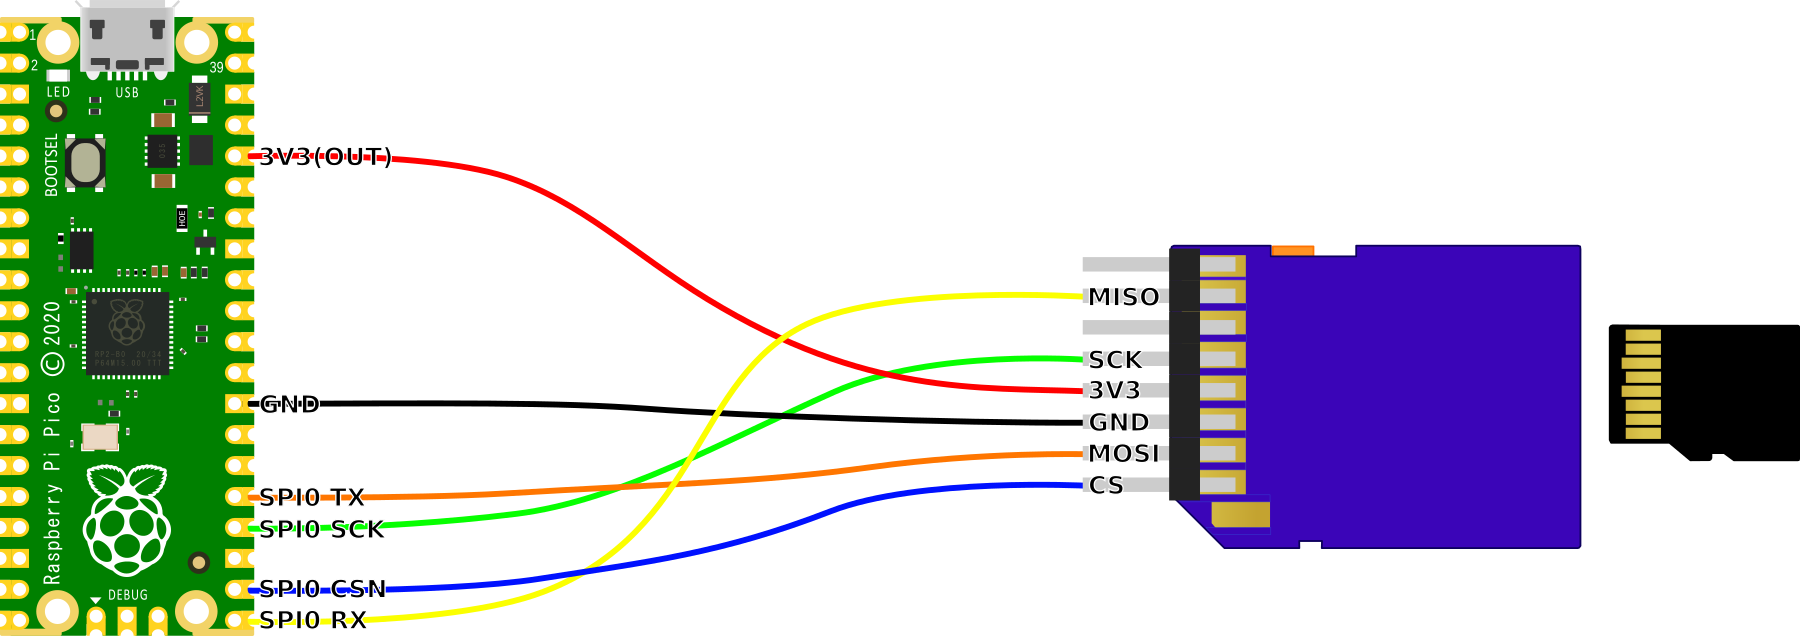
Bonus Connection!
If you’re keen to DIY you can solder header pins to a more traditional SD to Micro SD card adapter and connect that up to our Pico. I was a little sceptical before trying it out, but it worked like a charm.
With that in mind, here is a connection diagram for when you have mastered your soldering skills.
No comments:
Post a Comment