
Multiple Temperature Measurements
This project will measure the temperature at multiple points using DS18B20 sensors. We will use the waterproof version of the sensors since they are more practical for external applications.
I've written this short explanation as part of the much larger book 'Raspberry Pi Pico Tips and Tricks'. You can download it for free (or donate if you wish) from here.
The DS18B20 Sensor
The DS18B20 is a ‘1-Wire’ digital temperature sensor manufactured by Maxim Integrated Products Inc. It provides a 9-bit to 12-bit precision, Celsius temperature measurement and incorporates an alarm function with user-programmable upper and lower trigger points.
Its temperature range is between -55C to 125C and they are accurate to +/- 0.5C between -10C and +85C.
It is called a ‘1-Wire’ device as it can operate over a single wire bus thanks to each sensor having a unique 64-bit serial code that can identify each device.
While the DS18B20 comes in a TO-92 package, it is also available in a waterproof, stainless steel package that is pre-wired and therefore slightly easier to use in conditions that require a degree of protection. The measurement project that we will undertake will use the waterproof version.

The sensors can come with a couple of different wire colour combinations. They will typically have a black wire that needs to be connected to ground. A red wire that should be connected to a voltage source (in our case a 3.3V pin from the Pico) and a blue or yellow wire that carries the signal.
The DS18B20 can be powered from the signal line, but in our project we will use the supply from the Pico.
Hardware required
- 3 x DS18B20 sensors (the waterproof version)
- 4.7k Ohm resistor (I have used 10k Ohm resistor without problem)
- Jumper cables with Dupont connectors on the end
- Solder
- Heat-shrink
Connecting everything up
The DS18B20 sensors needs to be connected with the black wires to ground, the red wires to the 3V3 pin and the blue or yellow (some sensors have blue and some have yellow) wires to GP26 (pin 31). A resistor between the value of 4.7k Ohms to 10k Ohms needs to be connected between the 3V3 and GP26 pins to act as a ‘pull-up’ resistor.
We can actually use any of our GP pins to connect our sensors, as our code will will rely on a software library to manage the communications, not one of the hardware implementations on the microcontroller.
The following diagram is a simplified view of the connection.

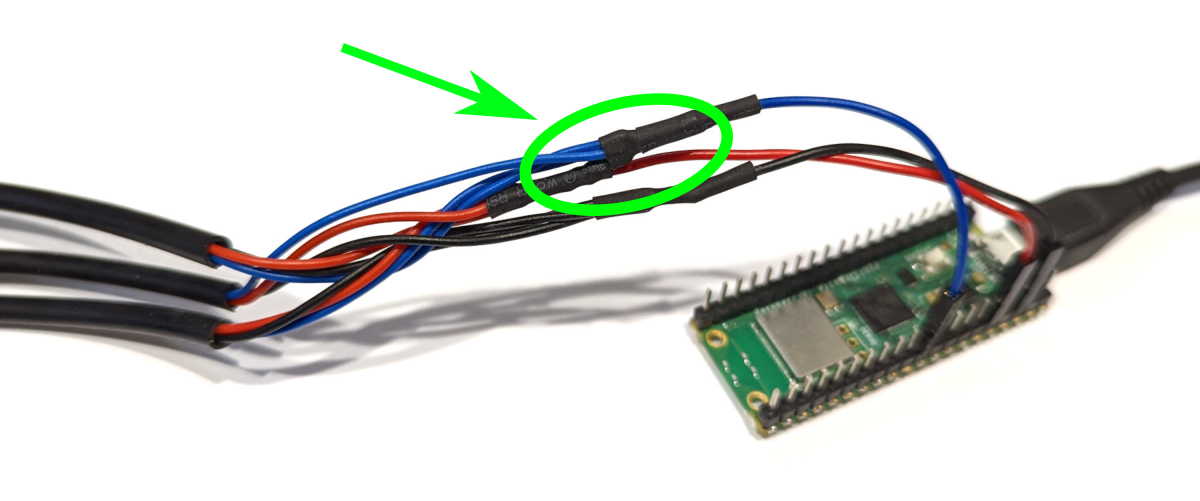
Connecting the sensor practically can be achieved in a number of ways. But because the connection is relatively simple we can build a minimal configuration that will plug directly onto the appropriate GPIO pins using Dupont connectors. The resistor is concealed under the heat-shrink and indicated with the arrow.
Code
The following code will read the temperature values from all the DS18B20 sensors that it finds and print out the unique serial numbers of each sensor and the temperature that it is reading.
import machine
import onewire
import ds18x20
import time
import binascii

gp_pin = machine.Pin(26)

ds18b20_sensor = ds18x20.DS18X20(onewire.OneWire(gp_pin))

sensors = ds18b20_sensor.scan()

print('Found devices: ', sensors)

while True:
    ds18b20_sensor.convert_temp()
    time.sleep_ms(750)
    for device in sensors:
        s = binascii.hexlify(device)
        readable_string = s.decode('ascii')
        print(readable_string)
        print(ds18b20_sensor.read_temp(device))
    time.sleep(10)
The output will look something like the following (which has three sensors connected);
No comments:
Post a Comment