
Using the Raspberry Pi Pico as a Prometheus Node
About Prometheus and Grafana
Prometheus is an open source application used for monitoring and alerting. It records real-time metrics in a time series database built using a HTTP ‘pull’ model.
It was was created because of the need to monitor multiple microservices that might be running in a system. It employs a modular architecture and employs modules called exporters, which allow the capture of metrics from a range of platforms, IT hardware and software.
Prometheus’s ‘pull model’ of metrics gathering means that it will actively request information for recording. It collects metrics at regular intervals and stores them locally. These metrics are pulled from nodes that run ‘exporters’. An exporter can be defined as a module that extracts information and translates it into the Prometheus format.
Prometheus data is stored as metrics, with each having a name that is used for referencing and querying. This is what makes it very good at recording time series data.
Prometheus is commonly used in combination with the Grafana platform which has a very powerful visualisation capability.
I have written a separate book on installing and using Prometheus and Grafana here and I would recommend it to anyone who is interested in monitoring their physical or IT environment.
Using the Pico as an Exporter
This particular guide will describe how to use the Raspberry Pi Pico W as an exporter node. This will allow the distribution of simple sensors to be even more widespread than is possible with a Raspberry Pi Zero or similar since they are cheaper and have lower power requirements.
There isn’t a dedicated Prometheus exporter available for the Pico, so we will make one ourselves.
The good news is that when gathering metrics for use in a Prometheus / Grafana stack installation, metrics can be made available from a device via a simple web query that details various metric values for consumption.
The information presented on the web page is set out in the exposition format published here.
In its most simple form the information can take the format of a metric name and a value separated by any number of blank spaces or tabs. If more than one line (metric) is being presented, these must be separated by a line feed character (\n). The last line must end with a line feed character. Empty lines are ignored.
For example;
A great deal more complexity can be integrated into the metric values including label names, and a time-stamp, but for the purposes of demonstrating the technique we will focus on a very simple example. For guidance on best practices for naming conventions and metric formatting in general, see the page on writing exporters here.
It is worth reinforcing here that this code is dependant on using the Pico W since it provides the mechanism for connecting to the Prometheus platform via a web request.
Code
The astute reader will recognise the following as being heavily based on the example used earlier in the book to serve a web page from the Pico W. Well spotted. You can also download this code as an extra with the book. It is bundled with the code samples extra and is called prometheus.py.
import network
import socket
import time
import random
import rp2

from secrets import secrets

ssid = secrets['ssid']
password = secrets['pw']

# Set country to avoid possible errors
rp2.country('NZ')

wlan = network.WLAN(network.STA_IF)
wlan.active(True)
wlan.connect(ssid, password)
wlan.ifconfig(('10.1.1.161','255.255.255.0','10.1.1.1','8.8.8.8'))

html = """# HELP pico_temp Temperature in C
# TYPE pico_temp gauge
pico_temp pico_temperature
# HELP pico_rand An Indication of a random number
# TYPE pico_rand gauge
pico_rand pico_random
"""

# Wait for connect or fail
max_wait = 10
while max_wait > 0:
    if wlan.status() < 0 or wlan.status() >= 3:
        break
    max_wait -= 1
    print('waiting for connection...')
    time.sleep(1)

# Handle connection error
if wlan.status() != 3:
    raise RuntimeError('network connection failed')
else:
    print('connected')
    status = wlan.ifconfig()
    print( 'ip = ' + status[0] )

# Open socket
addr = socket.getaddrinfo('0.0.0.0', 80)[0][-1]
s = socket.socket()
s.setsockopt(socket.SOL_SOCKET, socket.SO_REUSEADDR, 1)
s.bind(addr)
s.listen(1)

print('listening on', addr)

# Configure for reading temperature
sensor = machine.ADC(4)

def temperature_reading():
    reading = sensor.read_u16()
    voltage = reading * ( 3.3 / 65535)
    temperature = 27 - (voltage - 0.706) / 0.001721
    return(temperature)

# Listen for connections
while True:
    try:
        cl, addr = s.accept()
        print('client connected from', addr)

        request = cl.recv(1024)
        print(request)

        temperature = temperature_reading()
        rando = random.randint(0,99)

        print(rando)
        print(temperature)

        first = html.replace("pico_random",str(rando))
        last = first.replace("pico_temperature",str(temperature))

        response = last
        cl.send('HTTP/1.0 200 OK\r\nContent-type: text/html\r\n\r\n')
        cl.send(response)
        cl.close()

    except OSError as e:
        cl.close()
        print('connection closed')
This code combines several different components. It connects the Pico to a local network via WiFi. It sets itself a static IP address. It makes content available via port 80 so that it can be read by a browser. It serves content in an OpenMetric and Prometheus exposition format so that it can be read by Prometheus.
One of the more important parts of that is the setting of the static IP address via the following line;
This is important so that we can tell Prometheus where to go to read the metrics. It’s important to remember from the section earlier in the book that these settings need to be particular to your network.
The HTML
The HTML section is where the metric information is recorded for presentation to Prometheus. It took a bit of trial and error to get to the point where this was being presented in a format where Prometheus could read it from a practical perspective and then it took a bit more effort to ensure that the data was being presented correctly.
The first thing to notice is that it doesn’t include any HTML tags that we would expect for a regular page. It turns out that this did not play well with Prometheus. It refused to connect, showing the message "INVALID" is not a valid start token.
I then made the horrible mistake of thinking that the information on the lines with the # marks were the equivalent of comments in code. Boy was I wrong and it was a classic case of RTFM. The error response on Prometheus was invalid metric type "about the variable". So, after reading the doc on the Prometheus exposition format I could see that the HELP and TYPE lines also have to be specifically formatted!
Lines with a # as the first non-whitespace character are comments. They are ignored unless the first token after # is either HELP or TYPE. Those lines are treated as follows:
- If the token is HELP, at least one more token is expected, which is the metric name. All remaining tokens are considered the docstring for that metric name. HELP lines may contain any sequence of UTF-8 characters (after the metric name), but the backslash and the line feed characters have to be escaped as \ and \n, respectively. Only one HELP line may exist for any given metric name.
- If the token is TYPE, exactly two more tokens are expected. The first is the metric name, and the second is either counter, gauge, histogram, summary, or untyped, defining the type for the metric of that name. Only one TYPE line may exist for a given metric name. The TYPE line for a metric name must appear before the first sample is reported for that metric name. If there is no TYPE line for a metric name, the type is set to untyped.
So…. we could just omit the HELP and TYPE lines, but let’s persist.
The metrics
The astute reader (that’s you) will have noted that as well as the two metric names that we have included in our HTML section (pico_temp and pico_rand) we have also included a couple of place-holders that we will use in a few moments to substitute in our actual metric values. The place-holders are pico_temperature and pico_random.
Because our temperature measurement takes a bit of code to read, that is mostly included in the function temperature_reading.
sensor = machine.ADC(4)

def temperature_reading():
    reading = sensor.read_u16()
    voltage = reading * ( 3.3 / 65535)
    temperature = 27 - (voltage - 0.706) / 0.001721
    return(temperature)
The remainder of the metric code is in our while loop.
        temperature = temperature_reading()
        rando = random.randint(0,99)
The last piece of the puzzle is where we replace our place-holders with our metric values so that the information can be served and read.
With all of that complete, we are able to configure Prometheus and look at our target list to see glorious success! From there we can make a simple graph to display our metrics.
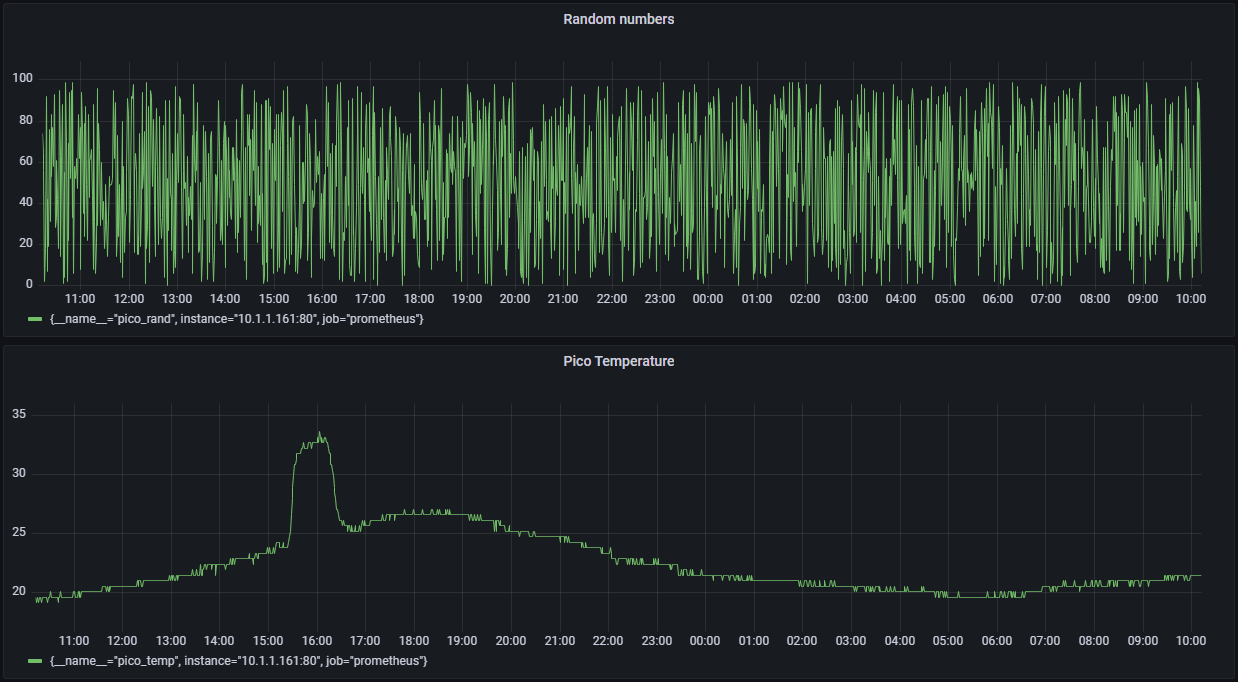
The graph above shows a 24 hour read-out of the random number and temperature metrics. The ‘blip’ that we can see around 1600 hrs is actually when the sun came through the office and passed over the Pico when it was sitting on the bench.
Make it your own
To use this code for yourself you will need to ensure that the metric you’re recording is made available in the HTML code in the while loop. Then ensure that you can replace the unique place-holder with the metric value. From there, Prometheus should do the rest.
You will have noticed that this description of how to make a measured value available to Prometheus for monitoring and display does not include a description of how to install and configure Prometheus. That’s a much longer story and I would recommend that if you don’t have an instance already installed, that you take a look at the book on installing it here.
This is great. Exactly what I was looking for
ReplyDelete